• Home
  • Suggest A DIY
  • DIY Newsletter

Home and Garden

Ideas For DIY

  • About CraftGossip
  • Our Network
    • Bath & Body Crafts
    • Candle Making Ideas
    • Crochet Ideas
    • Cross Stitch
    • Edible Crafts
    • Felting Patterns
    • Glass Art
    • Home & Garden Ideas
    • Indie Crafts
    • Jewelry Making
    • Kids Crafts
    • Knitting Patterns
    • Lesson Plans
    • Needlework
    • Party Ideas
    • Polymer Clay
    • Quilting Ideas
    • Recycled Crafts
    • Scrapbooking
    • Sewing Patterns
    • Card Making
    • DIY Weddings
    • Not Craft Ideas
  • Giveaways
  • Roundups
  • Store
  • Search

Using Milk Crates in your next DIY project? Don’t! It’s Illegal!

September 18, 2013 by Vikram Goyal

milk-crate-hero

I had no idea either! At home and garden and on our sister site, Craftbits.com, we use milk crates for a variety of projects.

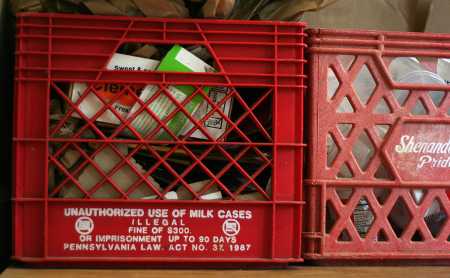
However, if you go by this article in the ModernFarmer, use of milk crates for anything other than carrying milk is illegal and can invite fines up to $300! Or jail time for 90 days.

Holy Cow!

Add to the fact that milk crates are so good as rubbish bins, temporary seats and convenient step ladders and you can see why they are so sought after.

What are your thoughts on this? Have you used milk crates in your DIY projects? Did you know that it was illegal?

Image from the article at ModernFarmer.


«
»

Comments

  1. Liz says

    September 18, 2013 at 11:13 am

    Actually, I did know this. When I started college (so long ago I don’t want to mention it) we were told that we couldn’t use milk crates in the dorms for this reason. And if we caught, blah blah blah.

    Now, we have a huge after-market of non-milk “milk crates”. Free is always nice, but they are reasonably priced, esp during back-to-school sale time. You might also find them as college kids leave stuff as trash when they move out.

  2. Sandee Spencer says

    September 18, 2013 at 11:15 am

    If you are wondering if they are free for the taking ALWAYS ask. My son met a kid that was doing community service at the dumb because he got arrested for taking palettes from behind a store. He thought they were free for the taking. Yikes!

  3. Dana says

    September 18, 2013 at 11:21 am

    You can still use crates that are designed to look like milk crates or antiques that are no longer in use, but it’s always been illegal to steal them from the grocers.

    I’ve always thought they were fun to use in many ways, I have some that are over 20 yrs old (dating myself lol) but they are decorator bought at Target because people were getting in trouble for stealing them from the back of the grocers. We forget sometimes, just because it’s set out doesn’t mean it’s free for the taking.

  4. Donna says

    September 18, 2013 at 12:39 pm

    I knew it was illegal awhile back but that’s because someone told me. We bought a couple at Wal-Mart – one for the car for milk 😉 and one for my sewing area.

  5. Kellie Brabec says

    September 18, 2013 at 1:13 pm

    It’s much cheaper and MUCH more legal to just invest the 10.00 in one at an office supply store. Besides, they’ll be cleaner, and will match!

  6. Bettina Groh says

    September 18, 2013 at 1:50 pm

    no I didn’t know that using them was illegal… my kids found loads of them in the trash ( so maybe mild delivery people and grocery stores ought to take better care of them?) and used them in college for all sorts of things just like you mentioned. They even used the old metal ones that took glass quart bottles. AND I don’t think any of them had the disclaimer on the side that you photographed!

  7. Heather R. says

    September 18, 2013 at 3:25 pm

    *Hee hee* The police officer who lives down the street has a crap-TON of ’em in his garage, storing everything from old LP’s to motor parts…I don’t think I have to worry about the handful of ’em I have around the house….

  8. caryn verell says

    September 18, 2013 at 3:42 pm

    the crates in the photo are clearly marked regarding the consequences of using them other than for their intended purpose by the owners of the milk company. seems to me that if they are not clearly marked or even marked at all then no laws have been broken. unless of course maybe this is a Pennsylvania law. it certainly is not a Mississippi law that I know of.

  9. Kathi says

    September 18, 2013 at 4:19 pm

    I have a vintage china rental business and I use new unlabeled milk crates that I buy from The Container Store for $9.99 each to pack and transport my rental dishes. At a wedding recently, I found that one of them was missing as I was repacking the dishes to transport home. It was found in the car trunk of one of the guests. I found it odd that he wouldn’t have realized he was stealing my property, but maybe he’s like everyone else who takes them from the milk companies.

  10. Donna says

    September 19, 2013 at 8:42 am

    My husband worked in dairies for 18 years so yes I knew that they belong to the dairies and when people walk off with them it costs the dairy a lot of money to replace them. I also know that when a crate is no longer suitable for commercial use the plastic is recycled. Unfortunately the part time clerk at the local convenience store may not know this and they may even help someone load them into the back of their vehicle.

    I also know that wood pallets belong to someone. New ones are not inexpensive and they are reused as many times as possible. Eventually they do break down to a point where they can’t be reused and some owners would be happy to let you have the broken ones. But you have to find and ask the pallet owner.

  11. Bieke says

    September 20, 2013 at 9:18 am

    here in Belgium we got blue crates, from the post office. they’re normally used by companies to collect the mail and take it to the post office… but most of all they’re used to take documentation to fairs or to store all sorts of supplies… that’s illegal as well… I guess they’re just too convenient

  12. Cath says

    October 8, 2013 at 9:37 pm

    Yes, I knew, and yes, I have a dozen or so, and yes, I do feel guilty about it and think about it often. And still use them. I can’t recall where I acquired them–not from behind stores. I’m not quite that crass. I suppose they were discarded by other people who took them from who knows where. Many of the dairies have gone out of business. What would I do with them if I tried to return them? They are very useful around the yard, and in the basement. Cringe (and I live in PA!) Every once in a great while the dairies run a campaign to get people to return them, with limited success. Mine look so shabby, I wouldn’t want milk delivered in them.
    As for pallets, sometimes they’re sold to companies that reuse them, sometimes they’re trashed. My husband works in a warehouse where they consider them a headache. They pile up outside and are used by skate punks at night, who then leave a mess behind. They have to get someone to haul them away periodically. Sometimes he brings some of the nice ones home to me and I put them to good use. They used to donate them to a fall bonfire, but I think they stopped doing that. Not good for the grass, or the air quality.
    Interesting points to ponder. Thanks.

  13. Lora Cotton says

    November 29, 2013 at 6:16 pm

    I’ve known it for YEARS, that’s why the only SAFE way to do this is to buy the milk-crate type crates that they have at Wal-Mart, Staples, etc. Then it’s all legit!!!

  14. Sam Owen says

    October 29, 2015 at 9:21 pm

    I was in law enforcement for 26 yrs. Not once did I arrest anyone for illegal milk crates nor do I know of any other officer who did. If it was that big of a deal there would be a Milk Crate Division at the Police Department. Don’t lose any sleep over the milk crates in your garage . Unless your stealing them from behind stores you don’t have anything to worry about.

  15. Victor Caballero says

    July 30, 2017 at 11:36 am

    I have two dogs that love to nap in their crates or under the covers. If you don’t have a secret spot for your pets already, turn a milk crate on its side, lay a soft blanket in the bottom of the crate, and drape another blanket over the top with space for the animal to walk in and out

Have you read?

DIY Fall Dustpan Wall Decor With a Rustic Aged-Metal Finish

Some craft projects begin with beautiful supplies. This one begins with a plastic dustpan, which is probably not what anyone expects to see on your autumn decorating list.

But with a little paint, a wooden backing board and a handful of fall foliage, that ordinary cleaning tool can become a lovely piece of rustic wall decor.

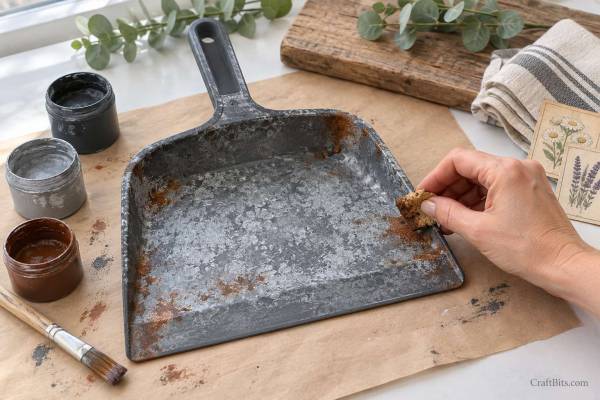
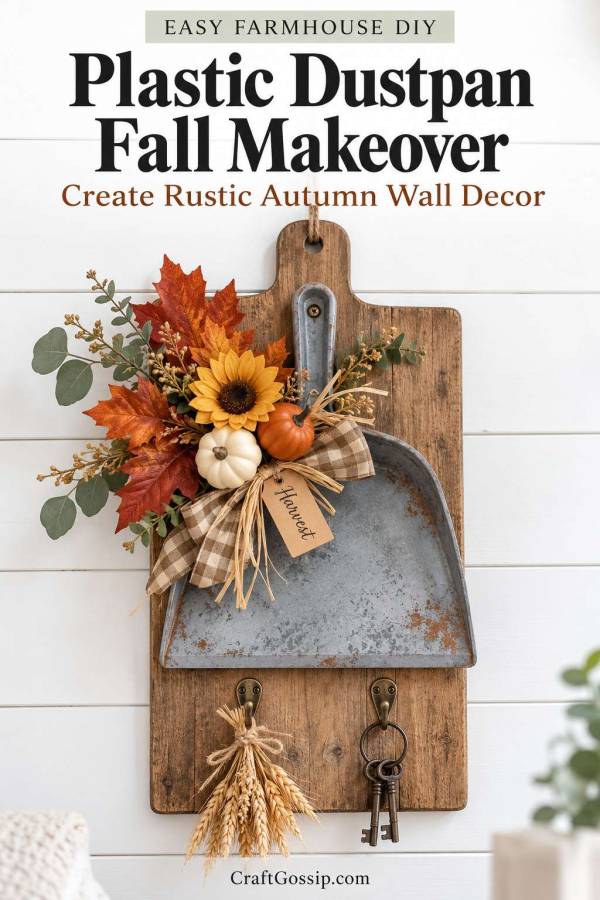
This DIY fall dustpan decoration uses layers of charcoal, silver-grey and brown paint to imitate weathered metal. Add copper-coloured leaves, a small sunflower, lightweight pumpkin picks and a checked fabric bow, and it has all the charm of a vintage farmhouse find.

I like that the dustpan still looks like a dustpan. That is part of the fun. We are giving an everyday object a creative second life, rather than trying to disguise it beyond recognition.

A Fall Wall Display With a Difference

The dustpan is mounted with its handle pointing upward, its sweeping edge at the bottom and its collecting surface facing outward.

Because the tray is shallow, the decorations are tied into place. Think of it as a base for an autumn arrangement rather than a deep pocket for loose pumpkins.

A few leaves and one or two small accents will usually look better than a whole bag of decorations squeezed together. Leave some of the painted surface visible so your aged-metal finish gets its moment.

If you enjoy checked fabric in your autumn decorating, our simple plaid fall wreath would make a lovely companion.

What You Will Need

  • A rigid plastic dustpan with raised sides and a short handle
  • A wooden cutting board or timber backing board larger than the dustpan
  • Dishwashing liquid and a cloth
  • Plastic adhesion primer suitable for the dustpan’s material
  • Compatible charcoal or black paint
  • Compatible silver-grey metallic paint
  • Dark brown and reddish-brown acrylic paint
  • Compatible matte clear sealer
  • Small paintbrush and sponge
  • Drill and suitable drill bits
  • Scrap timber for supporting the plastic while drilling
  • Two short wood screws and wide washers
  • Screwdriver
  • Thin craft wire or small cable ties
  • Faux autumn leaves and a few muted greenery stems
  • One small faux sunflower or autumn flower
  • One or two lightweight pumpkin picks
  • A strip of checked cotton or ribbon
  • A small kraft “Harvest” or “Welcome” tag
  • Optional raffia and two small screw-in hooks
  • Suitable picture-hanging hardware

Skill level: Beginner to intermediate
Making time: Around 1 to 2 hours, plus drying and curing
Display: Indoors

Choose pumpkin picks with stems or wire attachments. They are easier to secure than loose decorative pumpkins.

How to Make Fall Dustpan Wall Decor

1. Choose Your Dustpan and Board

Look for a sturdy dustpan that does not flex easily. A plain version without a rubber sweeping lip is the simplest starting point.

Position it on the board with the handle up and collecting surface facing you.

Leave a little timber visible around the sides and enough space below for optional hooks. Check that the back sits reasonably well against the board.

2. Plan the Attachment Points

Before painting, arrange your foliage loosely over the tray.

Mark two mounting holes where the plastic can sit against the timber and washers will lie flat. Choose positions that the foliage can hide later.

Mark a separate pair of small holes for tying in the flower arrangement. Keep all holes away from thin edges and moulded seams.

Support the plastic on scrap timber and drill slowly. Remove loose burrs. If the dustpan cracks, replace it before continuing.

3. Clean and Prime the Plastic

Wash the dustpan, rinse it and allow it to dry completely.

Follow your primer’s preparation instructions, including any recommendation to lightly scuff the surface.

Check the plastic compatibility carefully. Some dustpans are made from polypropylene, which needs a suitable adhesion product. Ordinary craft paint alone may peel away.

Apply thin primer coats and let them dry as directed.

4. Apply the Charcoal Base

Paint the visible surfaces charcoal or black, including the handle and side walls.

Use thin coats and allow each one to dry. This dark layer will show through the metallic paint and give the finish depth.

5. Sponge on the Metal Effect

Dip a sponge into silver-grey paint, then dab most of it off onto scrap paper.

Lightly stipple the colour over the charcoal base. Leave irregular dark patches between the silver marks.

Build the effect gradually. Aim for a mottled, weathered surface rather than a perfectly even silver coating.

Once dry, add small patches of dark brown around the corners, sweeping edge and handle base. Touch a little reddish-brown into selected areas for a faux-rust finish.

There is no need to cover the whole dustpan in brown. A few weathered patches are enough.

6. Seal and Allow to Cure

Apply a compatible matte clear sealer according to its instructions.

Allow the finish to cure fully before assembling the display. Paint can feel dry while still being soft enough to mark beneath wire, washers or fabric.

7. Mount the Dustpan on the Board

Transfer the mounting-hole positions to the wooden board and drill suitable pilot holes.

Attach the dustpan using short wood screws and wide washers. Choose screws that hold securely without protruding through the back.

Tighten gently. The washers spread the pressure, but overtightening can still distort the plastic.

Fit suitable hanging hardware to the back of the board.

8. Build the Autumn Arrangement

Gather a small spray of faux autumn leaves, muted greenery and one sunflower.

Place the taller stems behind and the shorter leaves toward the front. Let the foliage spread slightly to one side for a relaxed arrangement.

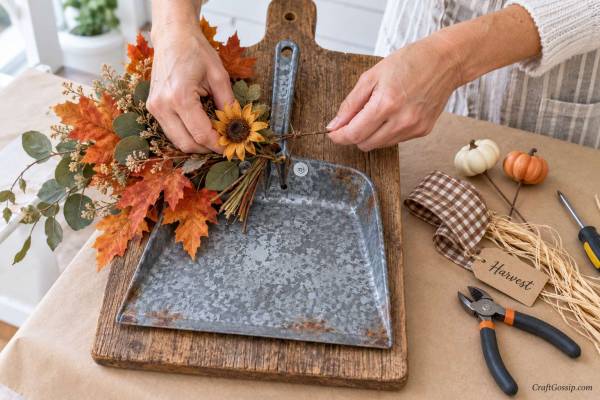
Secure the stems through the small attachment holes using craft wire or cable ties. Trim cable-tie tails and tuck wire ends away.

Keep part of the dustpan handle and painted tray visible.

9. Add the Pumpkin Picks

Position one or two small pumpkin picks near the lower part of the foliage.

Wire their stems into the secured arrangement so they cannot slide off the dustpan. Avoid relying on glue alone to hold bulky decorations vertically.

For a softer look, choose cream pumpkins with russet leaves. For a traditional harvest palette, use muted orange pumpkins, golden flowers and brown checked fabric.

10. Finish With a Bow and Tag

Tie a modest checked fabric bow around the gathered stems or secure it to the arrangement with wire.

Add a little raffia if you like, keeping the ends short enough to leave the tray visible.

Tie on a kraft tag reading “Harvest,” “Gather” or “Welcome.”

This is a good place to use those narrow fabric scraps we keep because they might become useful. Apparently they were waiting for a dustpan makeover.

11. Add Optional Hooks

If your board has room beneath the dustpan, install two small hooks in suitable pilot holes.

Use them for a lightweight dried-flower bundle or small autumn ornament. Follow the hooks’ load limits.

Check the complete display over a table before hanging it from a wall fixing suitable for its finished weight.

Fall Styling Ideas

Hang the display above an entryway console, beside a kitchen dresser or in a cosy dining nook.

You could place these scrap-wood pumpkin blocks on the shelf beneath it for a coordinating display. Their simple shapes work nicely beside the softer foliage.

For a larger autumn decorating scheme, our wooden porch pumpkin tutorial carries the rustic theme outside.

Keep this dustpan arrangement indoors. The painted plastic, fabric and decorative foliage are best protected from rain and damp.

Make It Easy to Change Next Year

Use ties for the main decorations so you can remove them when the season ends.

Store the foliage loosely to avoid crushing it, and keep the board somewhere dry. Next autumn, you can refresh the arrangement with a different bow or pumpkin colour without repainting the base.

That is the lovely thing about this project: the finish does most of the work, and the seasonal details are easy to change. A plain plastic dustpan gets a far more interesting job, and you get a handmade fall decoration with a story behind it.

Explore

Bedrooms Christmas Craft Ideas Easter Garden and Yard Halloween Holidays Home Decor Kitchens Living Areas Makeovers and Redos More DIY's Organizing Outdoor Decor Porches, Patios and Decks Recycled Crafts Seasonal Trash to Treasure Windows and Walls Wreaths

RSS feed: More Articles More Articles

  • Book Review Christmas And Winter Embroidery Patterns by De-ann Black
  • Knit Little Fish to Use Your Yarn Scraps
  • Designer Spotlight: Inkspire Studio Shops
  • 10 Fall Pet Scrapbook Layout Ideas
  • Homemade Toothpaste Tablets for a Zero-Waste Bathroom
  • Pattern Review: Granny Dots Crochet Bucket Hat Pattern
  • Free Printable Grungy Halloween Gift Tags
  • 10 Halloween Table Centrepieces You Can Make Yourself
  • Kent Rollins Cowboy Chili: A Hearty Dinner With Our 6 Easy Side Dishes
  • 20 Things to Buy at Thrift Stores for Crafts: Your Bargain Price Cheat Sheet

Copyright © 2026 · CraftGossip | Start Here | Contact Us | Link to Us | Your Editors | Privacy and affiliate policy