• Home
  • Suggest A DIY
  • DIY Newsletter

Home and Garden

Ideas For DIY

  • About CraftGossip
  • Our Network
    • Bath & Body Crafts
    • Candle Making Ideas
    • Crochet Ideas
    • Cross Stitch
    • Edible Crafts
    • Felting Patterns
    • Glass Art
    • Home & Garden Ideas
    • Indie Crafts
    • Jewelry Making
    • Kids Crafts
    • Knitting Patterns
    • Lesson Plans
    • Needlework
    • Party Ideas
    • Polymer Clay
    • Quilting Ideas
    • Recycled Crafts
    • Scrapbooking
    • Sewing Patterns
    • Card Making
    • DIY Weddings
    • Not Craft Ideas
  • Giveaways
  • Roundups
  • Store
  • Search

Amazing Pencil Lead Sculptures

August 24, 2010 by Amanda Formaro

As an artist myself, I get annoyed when I see the emails that circulate containing only photographs of mouth dropping art with no credit whatsoever to the creator. There’s no malicious intent of course, most people just pass things from friend to friend, and whoever copy and pasted it to begin with probably didn’t think anything of it. This is one such instance.

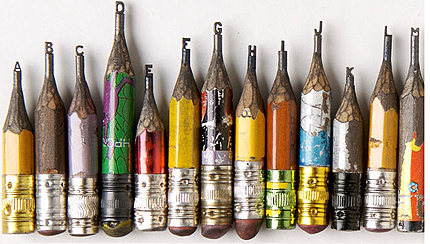
This morning I received an email from a friend containing some incredible images. Tiny little carvings and sculptures all from pencil lead! Oh, the steady hand and patience (not to mention good eyesight) that would be needed for this!
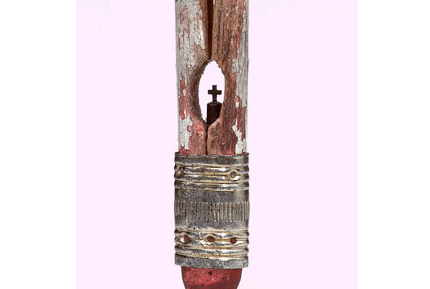
I did a little searching and found that these phenomenal creations were created by artist Dalton Ghetti. Dalton is a carpenter by trade and has been carving these tiny sculptures from graphite for over 25 years. A quote from Telegraph UK:

The 49 year old said: “At school I would carve a friend’s name into the wood of a pencil and then give it to them as a present. Later, when I got into sculpture, I would make these huge pieces from things like wood, but decided I wanted to challenge myself by trying to make things as small as possible. I experimented sculpting with different materials, such as chalk, but one day I had an eureka moment and decided to carve into the graphite of a pencil”
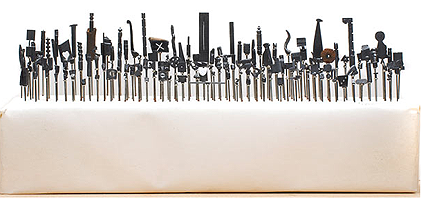
Even more amazing, Dalton doesn’t sell any of his work, only gives it away to his friends. The tools of his trade are a sewing needle, razor blade and a sculpting knife. He even has a “cemetery collection” for those pieces that broke before he could complete them.

Quote:

Dalton has made about 100 carvings, and is currently working on an epic piece inspired by the September 11 attacks on the World Trade Center. He said: “I decided to make a teardrop pencil carving for each of the people who died in the attack, about 3,000. Since 2002 I have carved one every day, it takes me under an hour. When I’m done they will form one big tear drop. It will take me about 10 years but it will be worth it”

To see the entire slideshow and read about Dalton, go to Telegraph UK. Scroll over each picture and an arrow will appear, or use the next and previous buttons in the upper right side.

There are a few more pictures on Silvermine Guild Art Center’s website and quite a few more, including a photo of the artist, on Buzzfeed.

«
»

Comments

  1. Lakshmi Sadala says

    August 24, 2010 at 2:26 pm

    Hi,
    I too got the email last week but never know the great artist. Thank you for your search and giving the information about the great artist.

  2. Barbara Crawford says

    August 24, 2010 at 5:27 pm

    Absolutely awesome. Thanks for sharing!

  3. meaghan mountford says

    August 25, 2010 at 2:18 am

    Incredible post on this incredible art. Bravo! I had seen these featured elsewhere, too, (credited, luckily), and was stunned by the intricacy as well!

  4. Notebook says

    August 25, 2010 at 6:20 am

    10 years? Wow he must have been really emotionally affected. Too bad you can’t buy any of his work!

Trackbacks

  1. Driftwood Horses · Home and Garden @ CraftGossip says:
    August 26, 2010 at 1:01 pm

    […] Key and Towel Racks10 Fab Photo DisplaysVideo: How to Make a Laundry Chute8 Easy to Build Fire PitsAmazing Pencil Lead SculpturesDIY Video: Decoupage Craft Paper FloorGina's Etsy Success SecretsDIY Lap TrayFabric Covered […]

Have you read?

DIY Giant Eyeball Lanterns – Creepy Halloween Decoration

When it comes to Halloween, bigger is always better—and these giant eyeball lanterns prove it! With nothing more than plain white paper lanterns, a little paint, and some imagination, you can create huge, spooky eyes that look like they’ve popped right out of a monster movie.

They’re perfect for hanging from ceilings, displaying on porches, or grouping together in a corner for an eerie effect. Best of all, paper lanterns are super inexpensive (you can grab them on eBay, Amazon, or even your local dollar store), which makes this a great budget-friendly craft for big impact Halloween décor.

Supplies You’ll Need

  • Large round white paper lanterns (various sizes look best) 
  • Acrylic paints or craft paints in black, brown, green, red, orange, or blue (for irises) 
  • Wide paintbrush for background color 
  • Small paintbrush for details 
  • Black construction paper or cardstock (optional for spiky “lashes” or accents) 
  • Hot glue gun or strong craft glue 
  • String or fishing line (if you want to hang them) 

Step-by-Step Instructions

Step 1: Prep the Lanterns

  1. Assemble your white paper lanterns according to the package directions. 
  2. Make sure they’re fully open and the wire insert is in place so the surface is taut for painting. 

Step 2: Paint the Iris

  1. Using a wide brush, paint a large circle in the center of the lantern to create the iris. 
  2. Choose spooky colors—green, red, orange, or blue work wonderfully. 
  3. Don’t worry about making it perfectly smooth; streaks and uneven textures add to the eerie, organic look. 

Step 3: Add the Pupil

  1. Once the iris paint is dry, use black paint to fill in the pupil at the very center. 
  2. Make it large enough to stand out against the iris. 

Step 4: Detail the Eye

  • Use a smaller brush to add darker or lighter streaks in the iris for a more realistic effect. 
  • You can even add thin vein lines in red around the iris to give it that bloodshot look. 

Step 5: Optional Spiky Lashes

  1. Cut long triangles from black construction paper or cardstock. 
  2. Glue them around one side of the lantern so they stick out like sharp monster eyelashes. 
  3. This makes the eyeballs look even more monstrous and stylized. 

Step 6: Display Your Giant Eyeballs

  • Hanging: Use string or fishing line to suspend them from ceilings, trees, or porch rafters so they look like floating eyeballs. 
  • Stacked: Place them in corners, along stairs, or even grouped on your lawn for a spooky display. 
  • Tabletop: Use them as oversized Halloween party props. 

Tips & Variations

  • Glowing Eyes: Insert battery-powered LED lights into the lanterns so they glow from the inside. 
  • Rainbow Eyes: Mix up the colors and make a whole rainbow of creepy eyes. 
  • Monster Cluster: Group multiple eyeballs together in different sizes for a scarier effect. 

This DIY Giant Eyeball Lantern craft is quick, cheap, and gives you maximum Halloween spook factor with minimal effort. Whether you make one or a whole creepy collection, your haunted house setup will definitely be eye-catching!


Explore

Bedrooms Christmas Craft Ideas Easter Garden and Yard Halloween Holidays Home Decor Kitchens Living Areas Makeovers and Redos More DIY's Organizing Outdoor Decor Porches, Patios and Decks Recycled Crafts Seasonal Trash to Treasure Windows and Walls Wreaths

RSS More Articles

  • DIY Giant Eyeball Lanterns – Creepy Halloween Decoration
  • Designer Spotlight: Artmishka Cross Stitch
  • Freebie Friday – Grungy Pumpkins and Fall Tags Junk Journal Printables
  • Free Paisley Flowers Embroidery Design Review
  • Knit a Log Cabin Blanket with All Your Scraps
  • 16 Big Halloween Crochet Projects You Need to Start Now
  • How to Make Tropical Summer Mini Interactive Album
  • Book Review: Fine Whitework by Jenny Adin-Christie
  • Learning Numbers for Preschoolers
  • 6 Free Celestial Coloring Pages

Copyright © 2026 · CraftGossip | Start Here | Contact Us | Link to Us | Your Editors | Privacy and affiliate policy