• Home
  • Suggest A DIY
  • DIY Newsletter

Home and Garden

Ideas For DIY

  • About CraftGossip
  • Our Network
    • Bath & Body Crafts
    • Candle Making Ideas
    • Crochet Ideas
    • Cross Stitch
    • Edible Crafts
    • Felting Patterns
    • Glass Art
    • Home & Garden Ideas
    • Indie Crafts
    • Jewelry Making
    • Kids Crafts
    • Knitting Patterns
    • Lesson Plans
    • Needlework
    • Party Ideas
    • Polymer Clay
    • Quilting Ideas
    • Recycled Crafts
    • Scrapbooking
    • Sewing Patterns
    • Card Making
    • DIY Weddings
    • Not Craft Ideas
  • Giveaways
  • Roundups
  • Store
  • Search

Child’s Own Studio is Seeking Softie Makers

February 17, 2012 by Amanda Formaro

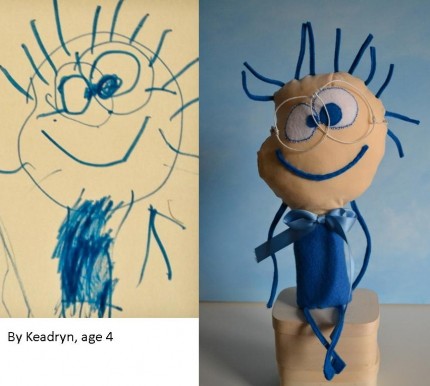
I have something really cool to share with you. I almost didn’t because in a post on the 7th the site owner begged for mercy and asked for no more pinning and blog features, at least until she could get caught up on email requests! But then on the 13th she put out a request for help, from crafty people who would like to join her in making some of the coolest softie toys I’ve ever seen. She (I keep calling her ‘she’ because I couldn’t find her name on the site) takes a child’s drawing and turns that drawing into a softie. Genius.

When my now 19 year old son was in first grade he drew a colorful face with lots of fun features. I took that picture and painted it onto a glass jar. He still uses it TODAY to hold pens and pencils. My point? Excellent keepsake that he has cherished for almost 14 years now.
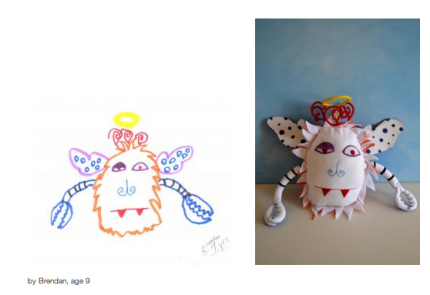
These softies have been all over Pinterest and blogged about in several places. I’m here to tell you that she needs help! So if you sew and are looking to be a part of this exploding enterprise, go to Child s Own Studio and click on the tab “The Other Talented Softie Makers”.
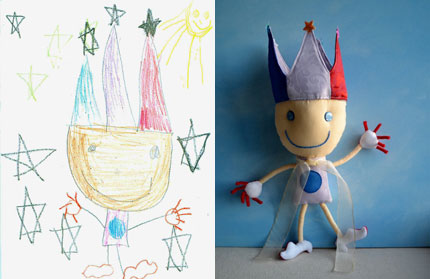
Warning though. Once you start looking at all of these fun and totally amazing creations you’ll be there a while. And you thought Pinterest was a time suck! 😉

«
»

Comments

  1. Kimberly says

    February 18, 2012 at 8:43 pm

    WOW! This is completely AWESOME! Wish I could sew! 🙂

    • Amanda Formaro says

      February 21, 2012 at 4:26 pm

      I know, I thought the same thing 🙂

  2. Sarah @ Dolls And Daydreams says

    February 20, 2012 at 10:49 pm

    too cute! Love them … what a wonderful idea xxx

  3. Monica H says

    February 21, 2012 at 2:21 am

    This is one of the coolest ideas I have seen in a long time

  4. Sheilagh says

    February 21, 2012 at 2:40 am

    a simple but brilliant idea, and beautifully executed! – thanks for bringing it to our attention. I think the lady’s name must be Wendy Tsao, as that’s who’s copyrighted the images on the information page 🙂

  5. Karen Mead says

    March 19, 2012 at 6:41 am

    This is the most fantastic thing I think I have ever seen. I love this and I want to have her do this for my grandsons.

  6. sam says

    May 21, 2013 at 7:13 pm

    who do i contact to order?

    • Amanda Formaro says

      May 27, 2013 at 8:27 am

      Follow the link in this post and you can ask from there.

Have you read?

10 Tufted Wall Hanging Tutorials for Creating Cosy Textile Art

There is something wonderfully comforting about a piece of handmade textile art hanging on the wall. Perhaps it is the softness, the slightly uneven tufts or simply the fact that yarn instantly makes a room feel warmer. Whatever the reason, tufted wall hangings have moved well beyond the craft room and are now turning up in living rooms, bedrooms, nurseries and those awkward little corners that have been waiting patiently for something interesting.

Tufted wall art can be bold and colourful, soft and neutral, wonderfully shaggy or surprisingly neat and graphic. You can create it with a tufting gun, punch needle, latch hook tool or even a few humble pom-poms and tassels. That makes this a lovely craft trend to explore whether you are ready to invest in rug-tufting equipment or would rather begin with yarn already tucked away in your cupboard.

I have gathered ten tufted wall hanging tutorials covering a good mix of styles and techniques. There are proper rug-tufting projects for anyone intrigued by those mesmerising tufting-gun videos, along with smaller latch hook and yarn projects that are far easier to tackle at the kitchen table.

One small warning from a long-time yarn hoarder: textile wall art is an excellent excuse to buy more yarn while insisting that it is technically home decorating.

Beginner Rug Tufting and Tufted Wall Art Tutorials

How to Tuft a Rug: A Complete Beginner’s Tutorial

This detailed guide walks through the full rug-tufting process, including choosing a simple design, stretching the backing cloth, transferring the image, threading the tufting gun and securing the finished yarn. Although demonstrated as a rug, the same method works beautifully for a soft, graphic wall hanging—and wall art does not have to survive muddy shoes or Aloo racing across it.

Make Your First Mini Tufted Rug

Starting small is one of the least intimidating ways to learn rug tufting, and this mini-rug tutorial covers the project from design planning through to finishing. A small piece is also ideal for wall display because it is lighter, quicker to complete and much easier to fit into an existing gallery wall.

Beginner Step-by-Step Rug Tufting Guide

This beginner tutorial explains how a tufting gun pushes yarn through tightly stretched backing fabric to form either cut or loop pile. It is a useful starting point when all the equipment names sound like another language and you want to understand the complete process before ordering half a craft studio.

Complete Beginner’s Guide to Rug Tufting

This guide is worth bookmarking if you want a thorough introduction rather than a quick project overview. It takes you through the essential tools, frame preparation, yarn placement and finishing stages needed to create rugs or tufted wall art with clean, defined shapes.

Three-Step Tufted Wall Art Finishing Tutorial

Finishing the back and trimming the front are what turn a fluffy experiment into something you are proud to hang on the wall. This tutorial focuses specifically on tufted wall art and demonstrates a heat-activated adhesive method, surface trimming and optional backing for a tidy result.

How to Hang a Tufted Rug on the Wall

Once you have made your gorgeous tufted piece, you still need to stop it sliding down the wall at three o’clock in the morning. This practical guide covers several display methods, including D-rings, wooden slats, hook-and-loop strips and stretching the work over a canvas frame.

Latch Hook Wall Hanging Tutorials

DIY Latch Hook Wall Hanging

Latch hooking gives you that wonderfully thick, tufted appearance without needing an electric tufting gun or a large wooden frame. This beginner-friendly wall hanging is a satisfying way to experiment with colour, pile length and geometric designs using a simple latch hook tool.

DIY Latch Hook Wall Hanging Tutorial

This project creates a tactile yarn wall hanging using latch hook canvas and short lengths of yarn. I particularly like latch hook projects for using leftover yarn because even small quantities can become colourful stripes, arches or deliberately shaggy sections.

How to Latch Hook for Beginners

This guide explains the basic latch hook technique and how the yarn knots are formed on the canvas. Once you understand the simple movement, you can use it to create wall hangings, small rugs, cushions or wonderfully retro pictures that would not look out of place in a 1970s craft book.

Easy Yarn Wall Hangings with Tufted Texture

Easy Pom-Pom Boho Wall Hanging

This CraftBits tutorial combines handmade pom-poms, tassels, beads and a natural twig to create a soft bohemian wall hanging. It is not made with a traditional tufting gun, but it delivers plenty of plush yarn texture and is a far more accessible choice for children, group crafting or a relaxed afternoon project.

You may also like the DIY Boho Tassel Wall Hanging, another easy CraftBits project that turns ordinary yarn into soft, layered wall décor.

Choosing the Right Tufting Method

A tufting gun is the fastest option for producing dense textile artwork, but it also requires the largest investment. You will generally need a tufting gun, sturdy frame, primary tufting cloth, yarn, adhesive, backing material and a set of clippers or scissors for shaping the pile.

Punch needle and latch hook projects are slower, but they are much easier to begin at home and require fewer specialised supplies. They are especially good for small wall hangings, abstract patterns and projects made from leftover yarn.

For an even simpler interpretation, pom-poms and tassels can create a soft, tufted effect without any special textile tools. These are ideal when you want a quick project, something suitable for younger crafters or a reason to use the mysterious collection of half-finished yarn balls living in the cupboard.

Tips for Making Tufted Wall Art Look Polished

Begin with a simple shape or bold graphic design. Fine lettering, tiny curves and intricate facial details can be difficult to keep crisp when you are still learning how the yarn behaves.

Choose colours with enough contrast that the design remains clear from across the room. Subtle neutral shades can be beautiful, but it helps to vary the pile height or yarn texture so the different sections do not blend into one woolly beige cloud.

Trim gradually. You can always remove more yarn, but unfortunately there is no magical reverse haircut for an overenthusiastically shaved tuft.

Always secure the back carefully before removing or displaying the work. Wall hangings experience less wear than floor rugs, but the yarn still needs adhesive or another stabilising finish to prevent loose tufts.

Finally, choose a hanging method that suits the size and weight of the piece. Small designs may only need stitched rings or a dowel, while larger tufted wall hangings benefit from a wooden support that prevents sagging and curling.

More DIY Textured Wall Art Inspiration

Tufting is only one way to bring texture into your home. CraftGossip’s easy textured canvas wall art tutorial creates raised, sculptural artwork using joint compound and paint. It would look lovely displayed alongside a small tufted piece, particularly if you repeat the same colour palette across both projects.

Whether you choose a proper tufting gun, a latch hook tool or a fork full of pom-pom yarn, these tufted wall hanging tutorials offer plenty of ways to add handmade warmth to your walls. Start with something small, embrace the occasional uneven tuft and remember that those tiny imperfections are exactly what stop handmade décor from looking mass-produced.

Explore

Bedrooms Christmas Craft Ideas Easter Garden and Yard Halloween Holidays Home Decor Kitchens Living Areas Makeovers and Redos More DIY's Organizing Outdoor Decor Porches, Patios and Decks Recycled Crafts Seasonal Trash to Treasure Windows and Walls Wreaths

RSS More Articles

  • 10 Free Sunflower Machine Embroidery Patterns
  • Beginner Needle-Felted Strawberries: A Step-by-Step Tutorial
  • Celebrating Mexican Independence Day
  • 10 Tufted Wall Hanging Tutorials for Creating Cosy Textile Art
  • 10 Modern Zig Zag Quilts That Feel Fresh and Graphic
  • Colorful Maker Hat Crochet Pattern Review
  • 12 Emulsified Sugar Scrub Recipes That Rinse Away Like Lotion
  • 12 Floral Birthday Cards for Spring and Summer
  • The Pancake Market Bag – Free Crochet Pattern
  • Backpack Cross Stitch Patterns

Copyright © 2026 · CraftGossip | Start Here | Contact Us | Link to Us | Your Editors | Privacy and affiliate policy