• Home
  • Suggest A DIY
  • DIY Newsletter

Home and Garden

Ideas For DIY

  • About CraftGossip
  • Our Network
    • Bath & Body Crafts
    • Candle Making Ideas
    • Crochet Ideas
    • Cross Stitch
    • Edible Crafts
    • Felting Patterns
    • Glass Art
    • Home & Garden Ideas
    • Indie Crafts
    • Jewelry Making
    • Kids Crafts
    • Knitting Patterns
    • Lesson Plans
    • Needlework
    • Party Ideas
    • Polymer Clay
    • Quilting Ideas
    • Recycled Crafts
    • Scrapbooking
    • Sewing Patterns
    • Card Making
    • DIY Weddings
    • Not Craft Ideas
  • Giveaways
  • Roundups
  • Store
  • Search

DIY Easter Wreath

February 26, 2018 by Shellie Wilson

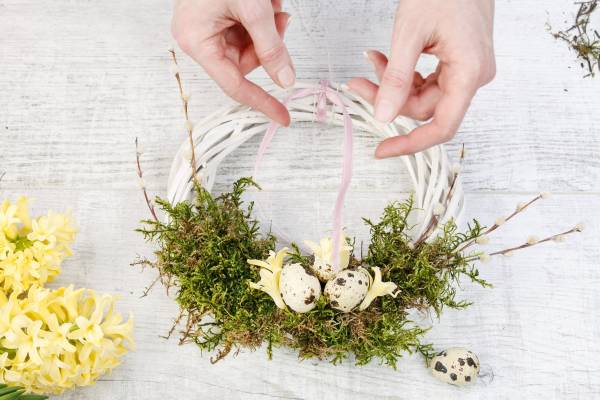
This Easter wreath is adorable and sweet, you can hang it on a door or lay it flat for an Easter table centrepiece. To create this wreath you will need A wicker wreath or florist ring, some Green Moss, silk flowers and Faux Eggs.

Start  by laying out your Moss on to the wreath base. We used craft glue to glue ours in place but you could use hot glue too.

Arrange the eggs in a trio effect in the centre. Finish off with flowers. This DIY Easter project also looks lovely with Daffodils or baby’s breath. Use what you have on hand to make it a budget project.  You could use cardboard circles to create an Inexpensive kids version for Class room activities.

This article contains affiliate links, which means when you purchase from the links above we get a small % of the sale to fund our own Crafting addictions.

«
»

Comments

  1. theartsyonion says

    February 26, 2018 at 10:52 am

    This is absolutely adorable! The moss gives it such a lovely, organic look. I think I’m going to make a larger version with a natural grapevine wreath for my front door. That you for the ideas!

Have you read?

Dollar Tree Strainer Pumpkin Tutorial

This Dollar Tree Strainer Pumpkin is such a clever little fall craft, and I love that it turns something completely ordinary into rustic farmhouse décor. A simple kitchen strainer suddenly becomes a sweet autumn pumpkin filled with mini pumpkins, acorns, leaves, and seasonal texture.

What makes this project so charming is the mix of materials. The metal mesh strainer gives it that slightly vintage, farmhouse look, while the twine-wrapped handle makes it feel warm and handmade. Add in the burlap leaf and little fall fillers, and it becomes the kind of decoration that would look lovely on a mantel, tiered tray, kitchen shelf, or Thanksgiving table.

This is also a great budget-friendly Dollar Tree craft because you can customize it with whatever fall supplies you already have. Use white pumpkins for a neutral farmhouse style, orange pumpkins for a classic autumn look, or add berries, cinnamon sticks, raffia, ribbon, or fairy lights to make it your own.

I especially like that this project is different from the usual wreath or painted pumpkin craft. It has a cute “repurposed kitchen item” feel, which makes it perfect for anyone who loves upcycled décor and cozy handmade fall projects.

Explore

Bedrooms Christmas Craft Ideas Easter Garden and Yard Halloween Holidays Home Decor Kitchens Living Areas Makeovers and Redos More DIY's Organizing Outdoor Decor Porches, Patios and Decks Recycled Crafts Seasonal Trash to Treasure Windows and Walls Wreaths

RSS More Articles

  • FREE Dragonfly Die Cut Card Download
  • DIY Review: Vintage Milk Can Side Table Makeover – Upcycled Charm with a Story
  • Book Review Wednesday: 3D Beaded Animal Crafts for Kids
  • Book Review: Simple Sashiko – 20 Easy Projects to Create & Inspire
  • Easy Lacing Cards to Make for Kids
  • 12 Nature Inspired Scrapbook Layout Designs
  • Book Review: The Knitting Book
  • DIY Little Ghoul Balls For Halloween Tiered Tray Decor
  • Free Halloween Crochet Projects You Can Finish in a Weekend
  • Cross Stitch Sheep Projects

Copyright © 2026 · CraftGossip | Start Here | Contact Us | Link to Us | Your Editors | Privacy and affiliate policy