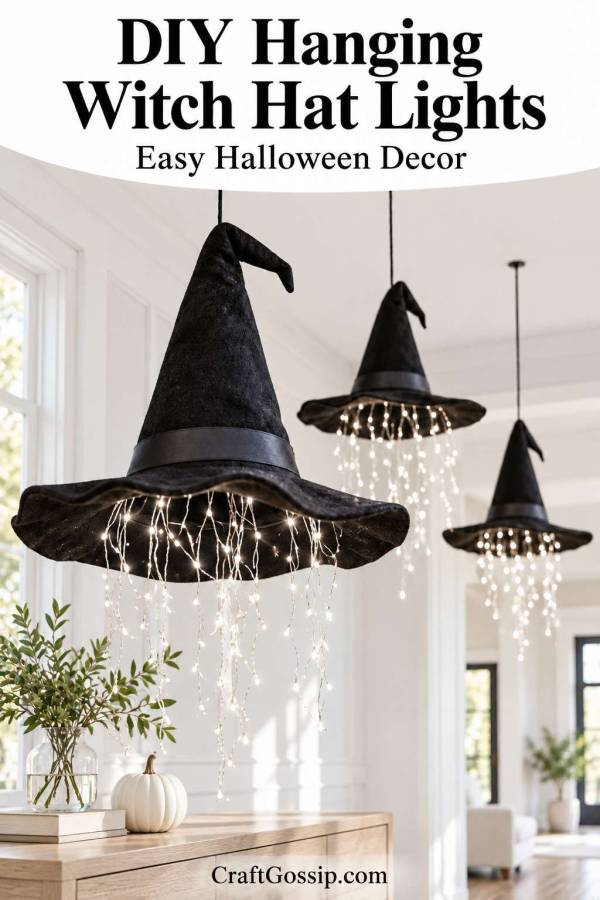
There is something wonderfully witchy about a hat floating in midair, especially when a shower of tiny golden lights hangs beneath it. It is Halloween decorating with a little less fright and a little more enchanted cottage.
These DIY hanging witch hat lights start with an inexpensive store-bought felt or nylon costume hat. Fabric stiffener helps the hat hold its shape, while lightweight LED waterfall lights create those lovely dangling strands beneath the brim.
The trick is choosing lights with several separate drops attached to a shared wire. Look for waterfall, curtain or drop-style fairy lights rather than one continuous string. That way, the lights fall naturally without having to loop a long strand backwards and forwards.
We have previously shared these floating witch hat luminaries, and this version gives the idea a cascading glow.
What You Will Need
- A lightweight store-bought felt or nylon witch’s hat
- Fabric stiffener suitable for your chosen fabric, or a homemade mixture below
- Lightweight battery-operated LED waterfall or curtain lights
- A low-temperature hot glue gun and glue sticks
- Small scraps of black felt
- Strong black thread and a sewing needle
- Strong hanging cord or suitably rated clear hanging line
- A suitable ceiling hook
- A soft paintbrush
- A bowl for mixing stiffener
- Plastic sheeting to protect your work surface
- A tall bottle or vase and plastic bags for supporting the hat
- Plastic-covered cardboard to support the brim
- Optional ribbon, buckle, black lace or lightweight star decorations
Skill level: Beginner friendly, with a little hand sewing
Making time: Around 45 to 60 minutes, plus drying time
Display: Indoors or in a reliably dry, sheltered position
Choose a small light set that fits beneath one hat. Large curtain lights can be too heavy and leave you with more wire than you know what to do with.
Choosing Your Witch’s Hat
Felt is usually the easier starting point. It has a little body already, and you can reinforce it with stitches where the lights attach.
A nylon costume hat can also work, particularly if it already has a wire-edged brim. However, some shiny or coated synthetic fabrics resist water-based stiffeners. Test a small hidden area, let it dry and check whether it becomes firmer before treating the whole hat.
If the stiffener beads on the surface, flakes off or leaves the fabric just as floppy, choose another hat. A cheap hat that cooperates is much more useful than a cheap hat that needs three evenings of negotiations.
The reference-style hats have an open, textured surface that allows light to shine through. Solid felt or opaque nylon will create a darker hat silhouette with glowing strands beneath it, which is still a lovely effect.
Prefer to sew your own base? Our witch hat sewing tutorial feature is another starting point.
Homemade Fabric Stiffener Recipes
Always test your mixture on a hidden section first. Black fabric can show dried residue, and different hats absorb stiffener differently.
These homemade mixtures are for dry decorative displays. They do not waterproof the hat.
PVA Glue Fabric Stiffener
This is the more useful homemade option when you want a firmer decorative shape.
Ingredients:
- ½ cup white PVA craft glue
- ¼ cup water
Mix until smooth. Brush a thin, even coat into the fabric, working it through rather than leaving thick puddles on the surface.
Allow the test section to dry completely. If the mixture is too thick to spread, add a little more water. If the finished fabric needs more body, apply another thin coat after the first has dried.
PVA mixtures can change the fabric’s sheen or leave pale marks on black material. Check your test patch in daylight before committing to the entire hat.
Cornflour or Cornstarch Fabric Stiffener
This gives lighter, temporary stiffness and is best suited to absorbent fabric. It is less dependable on slick nylon and may not support a floppy brim.
Ingredients:
- 1 tablespoon cornflour, called cornstarch in the US
- ¼ cup cold water
- ¾ cup water for heating
Mix the cornflour with the cold water to make a smooth slurry.
Heat the remaining water in a small saucepan. Stir in the slurry and cook gently, stirring, until the mixture thickens and becomes more translucent.
Remove from the heat and let it cool completely before brushing it onto the hat. Make a fresh batch for the project and discard leftovers.
For a heavier hat or a more lasting shape, choose a commercial fabric stiffener compatible with the material.
How to Make Hanging Witch Hat Lights
1. Test Your Lights First
Unpack the lights and gently separate the hanging strands.
Install the batteries and check that every drop works. Switch them off and remove the batteries before assembling the decoration.
Lay the lights beside the hat to check their proportions. The drops should hang beneath the brim without trailing onto furniture or into a walkway.
Do not cut or shorten the light wires unless the manufacturer specifically states that the set is designed for cutting.
2. Support and Shape the Hat
Cover your work surface with plastic.
Place a tall bottle or vase inside the hat to support the cone. Pad around it with loosely scrunched plastic bags so the fabric holds the shape you want.
Support the brim on plastic-covered cardboard. Small plastic-covered props beneath selected sections can create a gentle wave or lifted edge.
Keep the central opening accessible for later assembly.
For a crooked point, bend the tip slightly and support it while it dries. A gentle curve is easier to maintain than a tightly curled tip.
3. Apply the Fabric Stiffener
Follow the product instructions if using a commercial stiffener.
For a homemade mixture, brush on a thin, even coating. Pay particular attention to the cone’s base and brim, where the hat needs enough structure to carry its shape.
Avoid saturating glued trims or decorations that could loosen when wet.
Smooth away puddles and check that the fabric has not stuck to an uncovered support.
4. Allow the Hat to Dry Completely
Leave the hat on its supports until it is dry throughout.
Allow at least overnight as a starting point. Thick felt, generous coatings and humid weather may require 24 to 48 hours or longer.
Check the underside and seams before removing the supports. The hat should feel dry and hold its shape without assistance.
If it still droops, reshape it and apply another thin coat if appropriate for your stiffener.
Keep the lights away until all wet crafting is finished.
5. Add a Reinforced Hanging Loop
The hanging cord needs to support the decoration independently of the light wires.
Sew a small black felt reinforcement patch inside the upper cone, just below the tip or bend. Stitch a strong cord loop through the patch and hat fabric, using several secure stitches.
Bring the loop outside through a small opening between stitches or a carefully made hole.
For very thin nylon, use a felt patch on each side to spread the load.
Gently test the loop over a table before adding the lights. If the fabric stretches or tears, strengthen the attachment or choose a sturdier hat.
6. Arrange the Waterfall Lights Beneath the Brim
Position the lights’ shared horizontal wire around the underside of the brim, close to the cone’s base.
Let the separate drops hang freely downward. Space them around the front and sides, or distribute them around the whole hat if it will be viewed from every direction.
Temporarily hold the arrangement with loose thread ties.
Lift the hat by its hanging loop and check how the strands fall. Adjust them now, before fixing anything permanently.
7. Secure the Lights With Felt Tabs and Hot Glue
Use the glue to attach retaining tabs rather than applying hot glue directly to the electrical components.
Cut several small rectangles of black felt. Position each one across a section of the shared wire.
Apply small dots of low-temperature hot glue to the ends of the felt tab and press those ends onto the underside of the brim. Leave the centre unglued so it forms a little bridge over the wire.
Keep glue away from LEDs, wire joints, insulation and the battery box. Follow any attachment restrictions supplied with the lights.
Test the glue on a hidden area of nylon first because heat can distort thin synthetic fabric. If it does, sew the felt tabs in place instead.
Add enough tabs to distribute the weight without pulling the brim out of shape.
Leave the vertical drops loose. Their movement is what gives the decoration its waterfall effect.
8. Position the Battery Pack
Keep the battery box accessible so you can change batteries and operate the switch.
For a lightweight pack, sew a small felt pocket inside the cone near its base. Check that the hat remains balanced.
If the battery pack makes the brim sag, support it separately near the ceiling hook, provided the lead reaches comfortably. Leave slack in the lead so it does not carry the hat’s weight.
Do not glue the battery compartment shut or hang the decoration by its electrical cable.
9. Add the Finishing Details
Wrap ribbon or a strip of fabric around the cone’s base and add a lightweight buckle.
For a more textured look, attach a little black lace or gauze around the hat. Keep it clear of the dangling strands.
A few small stars can add sparkle. Ready-made star drop lights are the simplest option because the decorations are already incorporated into the set.
If adding your own stars, suspend them on separate threads attached to the brim so they do not weigh down the light wires.
10. Hang and Check the Finished Decoration
Use a hook and hanging cord rated for the complete decoration.
Reinstall the batteries, switch on the lights and check that the hat hangs level. Look for loose tabs, strained wires or a sagging brim.
Hang it away from door swings, fans and places where people or pets could catch the strands.
Use LED lights only, and keep the decoration away from candles, heaters and other heat sources. For a porch display, the entire light set, including its battery box, must be rated for that location. Homemade stiffener still needs protection from rain and damp.
Styling Your Floating Witch Hat Display
One hat makes a lovely feature above a Halloween side table. Three hung at different heights create more of that enchanted porch effect.
Warm white lights give a golden glow against black fabric. Purple or green lights create a bolder Halloween look, while a simple black ribbon keeps the hat itself looking classic.
For an extra handmade touch, you could use the mini crochet witch hat pattern on CraftBits to make coordinating table decorations.
The most effective part of this project is the space between those dangling strands. Give them room to fall, keep the hat lightweight and let the little lights do their thing. An inexpensive costume hat can become quite magical once it is floating above the furniture instead of sitting in the dress-up box.





Leave a Reply