• Home
  • Suggest A DIY
  • DIY Newsletter

Home and Garden

Ideas For DIY

  • About CraftGossip
  • Our Network
    • Bath & Body Crafts
    • Candle Making Ideas
    • Crochet Ideas
    • Cross Stitch
    • Edible Crafts
    • Felting Patterns
    • Glass Art
    • Home & Garden Ideas
    • Indie Crafts
    • Jewelry Making
    • Kids Crafts
    • Knitting Patterns
    • Lesson Plans
    • Needlework
    • Party Ideas
    • Polymer Clay
    • Quilting Ideas
    • Recycled Crafts
    • Scrapbooking
    • Sewing Patterns
    • Card Making
    • DIY Weddings
    • Not Craft Ideas
  • Giveaways
  • Roundups
  • Store
  • Search

How This DIY Craft Killed 33 People

April 27, 2022 by Shellie Wilson

Image Source

Do you know about Fractal burning? It is a woodworking technique that has become popular due to resin casting, as the resin is often poured into the burn marks as a filler. Especially popular with amateur woodworkers making charcuterie boards.

The “fractal burning” technique creates lightning-like burn marks by using jumper cables and disassembled microwave oven parts to run high-voltage electricity through a piece of wood soaked in a chemical solution.

Fractal burning is a pyrographic technique that is created by the burning of wood which creates branching tree-like patterns into the surface of your wood.

According to the American wood workers association, up to 33 people have now died trying to make these boards. I feel that in itself is enough reason NOT to try this.

Here is a video on fractal burning .

Please note: This video is not associated with any deaths and is shown here as an example of the craft only. We 100% do not recommend making it.

Can fractal burning be done safely? If you are a qualified electrician… yes, if you are a DIY crafter playing with dangerous elements then no.  When doing crafts we can generally SEE the danger, you can see a saw blade and axe, etc. With electricity you don’t see it coming, you have a false sense of security as the “danger” is invisible.

Want to make your own fractal chopping board? How about asking an electrical certified wood worker to make the base for you, then all you have to do is safely add the resin or seal the board. I believe this is the best and safest way to make your own fractal burning board without dying.
«
»

Comments

  1. Debbie Canfield says

    April 28, 2022 at 12:56 pm

    We have someone in my town that was killed a couple of years ago doing this craft. It is not worth it!

  2. Sue Davison says

    April 29, 2022 at 9:54 am

    Why put this post on then? Someone is bound to try it !!

Have you read?

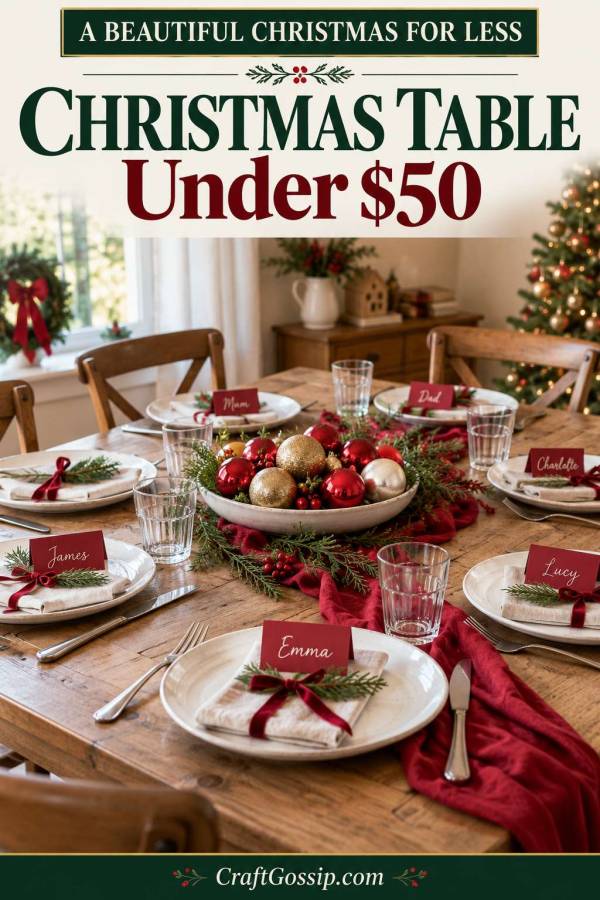
Christmas on a Budget – How to Style Your Christmas Table for Under $50 Without Buying New Tableware

Christmas decorating can become expensive one small purchase at a time.

A runner does not seem like much. Neither do the matching napkins. Then there are candles, place-card holders and a little arrangement for the middle.

Before you know it, the table has cost more to decorate than you intended.

This Christmas table plan sets a clear limit: less than A$50 in additional decorating costs for six people, using plates, glasses, cutlery and furniture you already own.

Food, drinks and household tableware are not included. The figures below are spending limits, not quoted retail prices.

You do not need to spend the full amount. Coming in at $12 because you reused nearly everything is an excellent result.

Make your budget before choosing your theme

Start with what is available at home, then allocate money only to missing details.

Possible purchaseMaximum allowance
Napkins, if neededA$8
One roll of ribbonA$6
Paper for cards or decorationsA$4
Battery  lightingA$10
One missing centrepiece elementA$8
Delivery, batteries or other extrasA$10
Planned maximumA$46

The remaining $4 keeps the plan below $50 and gives you a little breathing room.

If an item costs more than its allowance, substitute something rather than automatically increasing the total.

Decide what you can skip

For this table, leave these off the shopping list:

  • New dinner plates.
  • Decorative charger plates.
  • Bought place-card holders.
  • Matching Christmas glasses.
  • Individual decorations for every chair.
  • A ready-made floral centrepiece.

None is essential to a welcoming Christmas lunch.

A bare timber table, everyday crockery and a consistent colour detail can look lovely.

Pick an inexpensive colour connection

Red and cream work well when you own plain dishes and traditional Christmas decorations.

For another option, use green paper cards and natural twine. If your plates are patterned, choose one colour from the pattern instead of introducing several more.

A single roll of Christmas ribbon on Amazon is an optional way to connect the place settings. Compare length and delivered cost, then make one sample bow to calculate how much you need.

Do not buy a second colour simply because it is suggested beside the first one.

Build the centrepiece from your decorations box

Use an existing shallow bowl and a few ornaments.

Our Christmas balls centrepiece gives you an arrangement idea, but a loose bowl display avoids buying glue and preserves your decorations for next year.

Choose colours that work with your ribbon.

If you do not own baubles, a bowl of whole fruit already included in your grocery plan can work instead. Keep it unpainted and separate from craft materials so it remains useful afterwards.

Make place cards from scraps

Cut six pieces of cardstock to the same size and fold them in half.

Write the names clearly. Add a small drawn star or a strip of leftover paper if you like.

Consistent size and placement matter more than elaborate lettering.

For another handmade detail, browse our Christmas napkin-holder ideas. Pick a design that uses materials you own rather than treating the entire collection as a supply list.

Decorate behind the table if space is tight

A small dining table can feel crowded quickly.

One paper-bag star on the wall nearby can provide a festive focal point while leaving room for serving dishes. Use suitable fixings and keep paper away from heat.

This is particularly useful when your everyday table is doing its best to accommodate extra guests.

Count the extras before paying

Include delivery fees, batteries, adhesive and any additional packets needed to finish the project.

Keep a running total on your phone. If a purchase would push you over budget, remove something or choose a simpler option.

After setting the table, take a photograph and note what you used. Next year, you can repeat the look without shopping from scratch.

A budget Christmas table works because you make deliberate choices. Spend where it helps, reuse where you can and leave the unnecessary extras in the shop.

Explore

Bedrooms Christmas Craft Ideas Easter Garden and Yard Halloween Holidays Home Decor Kitchens Living Areas Makeovers and Redos More DIY's Organizing Outdoor Decor Porches, Patios and Decks Recycled Crafts Seasonal Trash to Treasure Windows and Walls Wreaths

RSS feed: More Articles More Articles

  • Designer Spotlight: Living on the Rainbow
  • The Bunny Sweater Knitting Pattern that’s Actually for Cats
  • AITA for Saying No to Christmas Orders Because I Want to Enjoy the Holidays?
  • Book Review: Twenty to Stitch Christmas Cross Stitch by Michael Powell
  • Christmas on a Budget – How to Style Your Christmas Table for Under $50 Without Buying New Tableware
  • 14 Free Crochet Christmas Ornament Patterns for Yarn Scraps and Handmade Gifts
  • 27 FREE Witchy SVG Cut Files and Printables
  • Learn About Greenland for Kids
  • Book Review: Patty Lyons’ Knitting ER
  • 10 Scrapbook Layout Ideas with Mixed Patterns for Fall and Halloween

Copyright © 2026 · CraftGossip | Start Here | Contact Us | Link to Us | Your Editors | Privacy and affiliate policy