You may have already noticed that using epsom salt as a craft medium is becoming more and more popular. It’s an inexpensive material that’s readily available at discount department stores and dollar stores. Epsom salt goes a long way and is perfect for creating pretty textures for all sorts of projects.
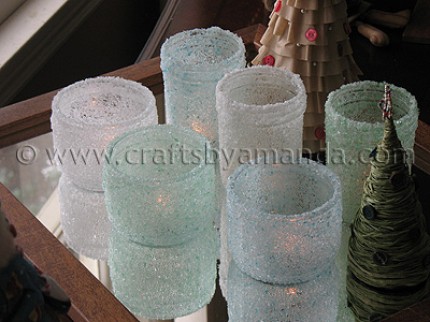
Two years ago I made these beautiful luminaries using epsom salt and food coloring. They quickly became very popular and have been shared generously throughout many forms of social media. I jumped on the bandwagon and started making different projects using epsom salt, but soon discovered that the gorgeous results I had found with my luminaries would be short lived. The salts eventually turned white and lost their pretty sheen.
At first I thought it was because of the salts coming in contact with the glue that caused the color change. Then I wondered if the heat from the candles inside the jars were causing the discoloration. That theory was shot down when I noticed some other projects I made that had no contact with heat had also turned white. As it turns out, over time the moisture from inside the salt crystals actually evaporates, leaving the chalky looking dry white salt. This would explain why epsom salt remains crystalized while inside its sealed package.
It wasn’t long afterward that the Epsom Salt Council reached out to me looking for a crafting expert to evaluate the validity of some of the epsom salt projects that were popping up everywhere. So I did a little experimenting and here’s what I’ve found:

Salt Crystals on Surfaces
If you are using epsom salt to cover a surface such as an ornament or a jar that will be exposed to the air, the salt will eventually dry out and turn white. Some examples of these types of projects include my Epsom Salt Luminaries, these glittery Easter Eggs, these Epsom Salt Ornaments and these snowflake ornies.

Other examples include this epsom salt covered candle, as well as these decorative wine bottles. All of these items will be exposed to air and within a few weeks the moisture from the salt will evaporate, leaving flaking, white salt.
That doesn’t mean you shouldn’t make them! Just keep in mind what will eventually happen and be prepared to treat these as temporary projects. Many people have asked about making my luminaries for their wedding and I have suggested that they be one of the last items they prepare so they won’t have to worry about the evaporation and color change. Another beautiful thing is that salt dissolves in water, so you can rinse off your project and reuse it for something else! I reused all of the jars that I originally used for my luminaries.
Science and Art
As far as crafting goes, epsom salt is a fun way to mix a little science with art, especially with kids. This article, How to Paint with Epsom Salts shows you how to create crystals on paper using a 1:1 ratio of boiling water and epsom salt. If you remember anything from science class, you may recall that a 1:1 ratio is not enough liquid to permanently dissolve the salt. This is how this project works. The salt will dissolve temporarily, but if allowed to sit for several hours, you will see salt begin to settle at the bottom of your container. You must have more water than salt for the salt to remain dissolved. Because of this, when you use a paintbrush to apply the salt water to colored construction paper, crystals will form on the paper as it dries. This is a fun project for children and a great way to teach a little science as well!

I experimented with this same 1:1 solution that I had used on the paper and began brushing it onto a glass jar. The result after several coats, was a bumpy, snowlike texture. After allowing the jar to dry completely (overnight) I have been able to grip the jar firmly and turn it in my hands, rubbing the salt texture with my hands. The salts stays firmly in place and none of it flaked off. However, all it would take is running it under a faucet to remove the texture.

Along the same lines are these puffy snowflakes. Because the amount of salt is much higher than the amount of water, the salt does not dissolve, but does break down enough so that when applied to paper and allowed to dry, the salt will stick to the surface.

A Little More Permanent
Using epsom salt is a great way to add texture to your projects. A fun example of this are these Epsom Salt Star Jars I created for the 4th of July. By Applying the salt and then painting over them, the texture is sealed inside the paint. There’s no chance of the salts flaking off and no worry of them turning white either. This method could be applied to many different surfaces such as wood, canvas, and glass.
So go for it, craft with epsom salts. Just know that if the salts are exposed to air they will eventually turn white, most likely within a few weeks. For more information about using epsom salts for health, beauty and even in the garden, visit the Epsom Salt Council’s website.


Hi,
Love this idea for the epsom salt luminaries. It was mentioned that after a period, moisture evaporates and the color dulls. Do they still loose that moisture and dull even after sealing them with the 3 coats of clear spray sealer? Did I misunderstand something there? Thanks.
It’s been a couple of years since I made these but I do believe that I actually applied that sealer that’s in the picture in the tutorial but they still lost their moisture.
Amanda I love this idea Epsom salts an candles.thanks for sharing..
You showed a picture with the wine bottles covered with the Epsom salts crystals, but you failed to say how you lite them up. Did you use electric/battery lights or how did you get candles inside the wine bottles?
Hi Margie. I don’t believe that the wine bottle craft is lit up. Just follow the link for the wine bottle craft and you can read the crafter’s full post on their blog.
Thank you for this! I appreciate you sharing the information. I am so inspired to try a project with epsom salts!
Would spraying the colored epsom salts with something, say like hairspray (the good ‘shellack’ kind), seal it enough to stop the discoloration or perhaps a clear coat of some kind either sprayed or brushed on, work to stop the problem?
I can’t say yes for sure. I sprayed mine with sealer and they still turned white. Brush in ruins the finish because it gets the salts wet which turns it into a blobbed mess. I wish I had an answer. I suppose I should go ahead and make some more and spray them several times to see if I can achieve success.
If the paint works, wouldn’t clear paint instead of sealer work?
What do you mean by clear paint?
Amanda,
We are going to use the luminaries for our wedding in February. Is it just the colored salt that turns white out if i just do white salt without any foods coloring will it turn a funny color. I am hoping to be able to do these soon so as to not be overwhelmed the week of the wedding. Thanks!
Hi BethAnn. I’m sorry to say that it the food coloring does not play a factor, therefore the plain epsom salt will still dry out and turn white. You may want to try one luminary right now and see how long it lasts. That might give you a better idea and allow you some extra time before the wedding 🙂
Hi there. These luminaries look so beautiful! I‘m going to give them a go & seal them with a spray-on, clear varnish. I‘ll let you know how they go (whether they last, or not) ;).
have you tried coloring the salt with a dry color medium like chalk or pastels? with a dry color agent rubbed onto the salt, you wouldn’t have to worry about the color evaporating. i probably won’t get to try any time soon, so thought i would share my idea for someone with more time. 🙂
Hello. Awesome blog! My question is, could I seal the epsom salt with a clear enamel? I am going to make ornaments for a charity and do not want the customer to receive the ornament and have it flake or not look good.
Would painting the jars/containers a pastel color then applying the Epsom salt have the same effect for the illuminaries?
Has anyone tried reviving the salts after they whiten by putting the object (obviously non flammable) into a 200 degree oven to dry out?
Curious for the color changing issue with epsom salt, if you sprayed a clear coating over the epsom salts after it has dried would this solve the problem of the epsom salt changing colors?
Hi, I love the idea of the jars and I want to make and send one to my sister – I wondered if you could help me in terms of packaging them as I assume they are quite delicate. Any ideas on any packaging materials I could use for their journey in the post so it doesn’t get there looking like a jar and lots of loose salt please? Thank you!
Would modge podge be a good sealent
I recently did frosted glasses using Epson salt. When it dried it turned a chalky white, so I painted sparkled modge podge over it and they turned out beautifully. Modge podge comes in a variety of finishes.
I haven’t crafted in a while and am eager to try the sparkle modge podge. Thanks for the tip!
Hi there, I have bought some wetlab Epsom salts….they won’t dry! Keep turning into a wet slime looking mess….am I just using the wrong type?
Hi,
Did you find the answer to this?
The dried epsom salt, did it still maintain it’s crystal shape or did it crumble to finer grains of salt?
For the luminaries, what would happen if you coat the jar with the glue and salt, let dry, then painted over it with those sea glass paints?