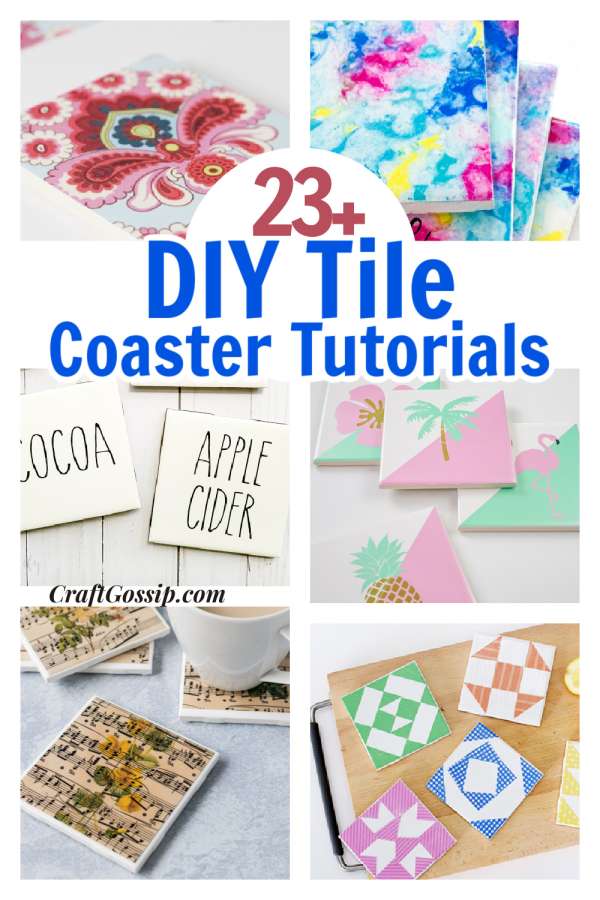
Tile coasters are an excellent DIY project that can serve as both a useful item in your daily life and a thoughtful handmade gift for your loved ones. These tutorials will show you various methods of making tile coasters using square tiles, which can easily be purchased from hardware, online, or bathroom stores.
The majority of the tutorials utilize a white tile as the base and add color through various techniques such as paints, alcohol pigments, sharpies, and patterned napkins. This gives you the ability to create a vast array of designs to fit any style or aesthetic.
Whether you want to create a coastal vibe with cool blues and whites or make a statement with bold black coasters and gleaming gold accents, the possibilities are endless. Not only are tile coasters practical, but they can also bring a touch of personality to your living space. With these tutorials, you can unleash your creativity and make unique tile coasters that suit your taste.
Package up your finished coasters with some ribbon for a special DIY handmade gift.
Small square tiles can be bought from any hardware store, online, or at bathroom stores.
One of my favorite tile projects is using printed napkins such as these crab napkins and these peony napkins They are used in an old-style decoupage technique applying the printed layer to the tile and then sealing with a high-quality sealer
 . Using holiday napkins you can make Christmas coasters, Easter coasters to decorate your holiday-themed tables.
How to make DIY tile coasters – Gathered
Bee Wreath Farmhouse Marble Coasters – Lace, Grace & Peonies
DIY Tile Coasters with Scrapbooking Paper – Easy DIY Projects
DIY Night: Tile Coasters with Scrapbook Paper – Design Improvised
Easy DIY Coasters with Sharpies and Alcohol! – Jessica Welling Interiors
DIY Ceramic Tile Coasters with Vinyl Lettering – Handmade in the Heartland
DIY Vintage Sheet Music Botanical Tile Coasters • Rose Clearfield
How To Make Tile Coasters Waterproof Using High Gloss
DIY Tile Photo Coasters – Doused in Pink
Hand Stamped Coaster Tiles — CraftBits.com
Ceramic Mosaic Tile Trivet — CraftBits.com
How to Stencil Tile Coasters for Home Decor
DIY Tile Coasters with Cricut Permanent Vinyl — Jen T. by Design
How to Make Coasters out of Ceramic Tiles and Napkins,- Joyfully Treasured
Colorful Sharpie Tile Coaster Craft — Doodle and Stitch
Rae Dunn Inspired Coasters DIY Beautify – Creating Beauty at Home
DIY Tile Coasters, Barn Quilt Inspired – Sugar Bee Crafts
DIY Tile Coasters – Happy Deal
Photo Tile Coasters {Using Resin} | Oopsey Daisy
DIY Stone Coasters: A Great Gift Idea – 1905 Farmhouse
How To Make Paint Pour Coasters
Making paint-pour coasters is a fun and easy DIY project that can add a pop of color to your home décor. These coasters are created by pouring multiple colors of paint onto a surface and allowing them to mix and flow together to create a stunning marbled effect. Not only are these coasters functional, but they also make for great handmade gifts. Here is a step-by-step guide on how to make paint pour coasters.
Materials needed:
Square tiles (4×4 inches or similar size)
Paint Pour Acrylic paints in different colors
Cups for mixing paint
Stir sticks
Clear sealer spray
Painters tape
Plastic sheet or cardboard
Disposable gloves (optional)
Step 1: Prepare your work surface by covering it with a plastic sheet or cardboard. This will prevent the paint from spilling and ruining the surface.
Step 2: Tape the edges of the tiles with painters tape to create a clean border.
Step 3: Pour a small amount of each paint color into separate cups. Mix the paint with a stir stick to make sure it’s well combined.
Step 4: Slowly pour the paint onto the center of the tile, creating a small puddle. Continue pouring the other paint colors onto the tile, creating a pool of paint in the center.
Step 5: Using a stir stick, gently mix the paint together to create the desired marbled effect. You can also tilt the tile to help the paint flow and mix together.
Step 6: Once you are satisfied with the marbled pattern, let the paint dry completely. This may take several hours or overnight.
Step 7: Once the paint is dry, spray a clear sealer over the entire surface of the tile. This will protect the paint and make the coasters more durable.
Step 8: After the sealer is dry, remove the painters tape from the edges of the tile.
Step 9: Your paint pour coasters are now ready to use! Place them under glasses or mugs to protect your furniture and enjoy their colorful and unique design.
In conclusion, making paint pour coasters is a simple and enjoyable DIY project that can add a touch of color and personality to your home. With a few basic supplies, you can create stunning coasters that are both functional and beautiful. So grab your paints and tiles, and start making your own paint pour coasters today!



Great ideas that you shared. Thank you!