• Home
  • Suggest A DIY
  • DIY Newsletter

Home and Garden

Ideas For DIY

  • About CraftGossip
  • Our Network
    • Bath & Body Crafts
    • Candle Making Ideas
    • Crochet Ideas
    • Cross Stitch
    • Edible Crafts
    • Felting Patterns
    • Glass Art
    • Home & Garden Ideas
    • Indie Crafts
    • Jewelry Making
    • Kids Crafts
    • Knitting Patterns
    • Lesson Plans
    • Needlework
    • Party Ideas
    • Polymer Clay
    • Quilting Ideas
    • Recycled Crafts
    • Scrapbooking
    • Sewing Patterns
    • Card Making
    • DIY Weddings
    • Not Craft Ideas
  • Giveaways
  • Roundups
  • Store
  • Search

8 Spring Flower Crafts

April 11, 2012 by Amanda Formaro

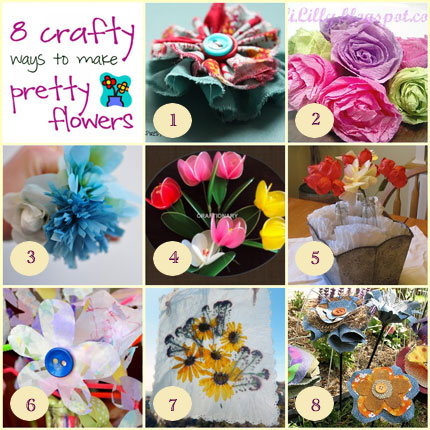
8 Spring Flower CraftsApril showers certainly do bring May’s beautiful flowers! Even crafty ones. Here are 8 different ways to create flowers using fabric, nylon, contact paper, tissue paper and more.

1. Fabric Flowers
2. Crepe Paper Roses
3. Tissue Paper and Crepe Paper Flowers
4. Nylon Tulips
5. Bubble Flowers
6. Contact Paper Flowers
7. Waxed Paper Pressed Flowers
8. Denim Fabric Flowers

Faux flowers are a great way to decorate your home and add some touches of color to a living space or work area.


Here are some fun flower facts you might not have known.

Did you know that broccoli is actually a flower?

Some plants such as orchids do not need soil to grow-they get all of their nutrients from the air, clearly not the plants that I have cause they apparently need more water than I gave them. I do not have a single green finger let alone a green thumb. I am pretty sure I could kill a plastic plant given the chance.

A flower, sometimes known as a bloom or blossom, is the reproductive structure found in flowering plants.

Flowers did not always exist they only appeared around 140 million years ago.

Roses are related to apples, raspberries, cherries, peaches, plums, nectarines, pears and almonds, I guess that is why they are edible right?

Dandelions might seem like weeds, but the flowers and leaves are a good source of vitamins A and C, iron, calcium and potassium.

Sunflowers move throughout the day, following the movement of the sun from east to west? have you ever noticed this?

Flowers and plants have been used medicinally for thousands of years. Some flowers, such as the lotus, have religious or historical significance.

In the 1600s, tulips were so valued that they were worth more than gold

Lavender is a beautiful purple flower that is native to the Mediterranean. It has a scent that is known to relax people and is a well used calmative.


«
»

Comments

  1. hani@craftionary says

    April 11, 2012 at 8:32 am

    wow.. Thanks so much for featuring me.. I am So excited! 🙂 I have your button on my featured page..
    Have a nice day

  2. Ami w/AliLilly says

    April 11, 2012 at 8:48 am

    WOW! What great ideas. I’m going to have to try some of these. Thanks for including mine. 🙂

Have you read?

DIY Giant Eyeball Lanterns – Creepy Halloween Decoration

When it comes to Halloween, bigger is always better—and these giant eyeball lanterns prove it! With nothing more than plain white paper lanterns, a little paint, and some imagination, you can create huge, spooky eyes that look like they’ve popped right out of a monster movie.

They’re perfect for hanging from ceilings, displaying on porches, or grouping together in a corner for an eerie effect. Best of all, paper lanterns are super inexpensive (you can grab them on eBay, Amazon, or even your local dollar store), which makes this a great budget-friendly craft for big impact Halloween décor.

Supplies You’ll Need

  • Large round white paper lanterns (various sizes look best) 
  • Acrylic paints or craft paints in black, brown, green, red, orange, or blue (for irises) 
  • Wide paintbrush for background color 
  • Small paintbrush for details 
  • Black construction paper or cardstock (optional for spiky “lashes” or accents) 
  • Hot glue gun or strong craft glue 
  • String or fishing line (if you want to hang them) 

Step-by-Step Instructions

Step 1: Prep the Lanterns

  1. Assemble your white paper lanterns according to the package directions. 
  2. Make sure they’re fully open and the wire insert is in place so the surface is taut for painting. 

Step 2: Paint the Iris

  1. Using a wide brush, paint a large circle in the center of the lantern to create the iris. 
  2. Choose spooky colors—green, red, orange, or blue work wonderfully. 
  3. Don’t worry about making it perfectly smooth; streaks and uneven textures add to the eerie, organic look. 

Step 3: Add the Pupil

  1. Once the iris paint is dry, use black paint to fill in the pupil at the very center. 
  2. Make it large enough to stand out against the iris. 

Step 4: Detail the Eye

  • Use a smaller brush to add darker or lighter streaks in the iris for a more realistic effect. 
  • You can even add thin vein lines in red around the iris to give it that bloodshot look. 

Step 5: Optional Spiky Lashes

  1. Cut long triangles from black construction paper or cardstock. 
  2. Glue them around one side of the lantern so they stick out like sharp monster eyelashes. 
  3. This makes the eyeballs look even more monstrous and stylized. 

Step 6: Display Your Giant Eyeballs

  • Hanging: Use string or fishing line to suspend them from ceilings, trees, or porch rafters so they look like floating eyeballs. 
  • Stacked: Place them in corners, along stairs, or even grouped on your lawn for a spooky display. 
  • Tabletop: Use them as oversized Halloween party props. 

Tips & Variations

  • Glowing Eyes: Insert battery-powered LED lights into the lanterns so they glow from the inside. 
  • Rainbow Eyes: Mix up the colors and make a whole rainbow of creepy eyes. 
  • Monster Cluster: Group multiple eyeballs together in different sizes for a scarier effect. 

This DIY Giant Eyeball Lantern craft is quick, cheap, and gives you maximum Halloween spook factor with minimal effort. Whether you make one or a whole creepy collection, your haunted house setup will definitely be eye-catching!


Explore

Bedrooms Christmas Craft Ideas Easter Garden and Yard Halloween Holidays Home Decor Kitchens Living Areas Makeovers and Redos More DIY's Organizing Outdoor Decor Porches, Patios and Decks Recycled Crafts Seasonal Trash to Treasure Windows and Walls Wreaths

RSS More Articles

  • Games to Make with LEGO Bricks
  • Classic Dishcloth Knitting Patterns
  • DIY Doily Pinch Bowl Set with Matching Platter
  • 4 Crayon Cutable or Printable Files for Back to School
  • How to Make a Crochet Vision Board – Plan the Crochet Projects You Actually Want to Make
  • What to Serve with Rotisserie Chicken: 21 Delicious Sides You’ll Want on Repeat
  • Etsy Feature – Moth Pottery Template for Slab Building
  • Hubcap Creatures: Transforming Roadside Finds into Sculptural Wildlife
  • Learning about Georgia for Kids
  • How to Make a Moth Birthday Card

Copyright © 2026 · CraftGossip | Start Here | Contact Us | Link to Us | Your Editors | Privacy and affiliate policy