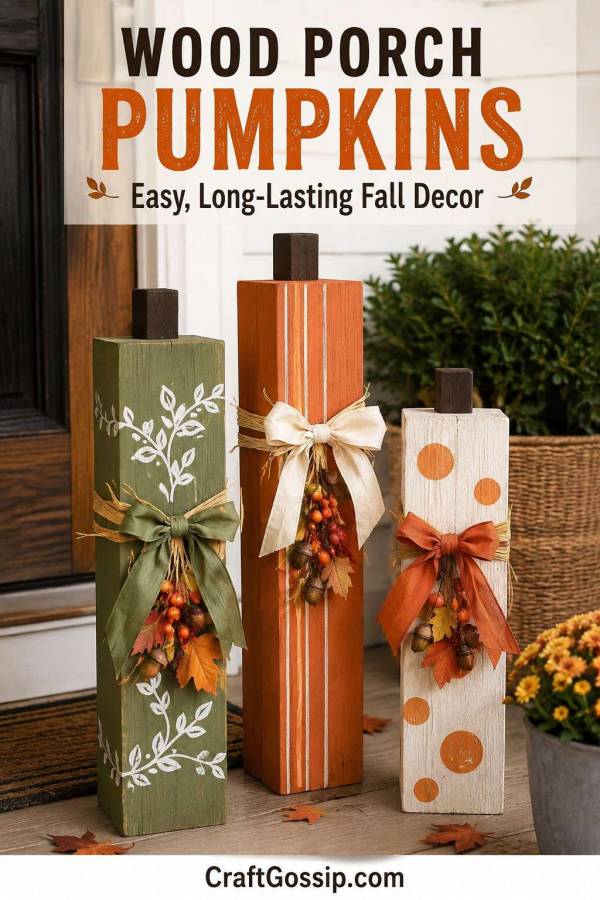
There is a very small window of time when real pumpkins look absolutely glorious on the front porch.
Then one gets a soft spot.
Another mysteriously sinks on one side.
And before you know it, you are carrying what can only be described as pumpkin soup to the rubbish bin.
These DIY wood porch pumpkins give you the same lovely autumn colour without the inevitable pumpkin collapse. Made from chunky timber posts or leftover scrap wood, they can be painted in traditional orange or given a more modern farmhouse look using cream, sage, terracotta and muted autumn colours.
The best part is that you make them once, store them at the end of the season and bring them back out every fall.
This updated version was inspired by the tall wood porch pumpkins previously featured on CraftGossip, but I wanted to create a complete tutorial you could actually follow without hunting down an old archived project.
And despite how substantial these look beside the front door, the woodworking is very basic. If you can cut—or have someone cut—a few pieces of timber, you can make these.
Supplies For DIY Wooden Porch Pumpkins
You will need:
- Chunky timber posts or scrap wood
- 4×4 timber works particularly well
- Saw or mitre saw, if cutting the wood yourself
- Sandpaper or electric sander
- Exterior or multi-surface paint
- Paintbrushes
- Painter’s tape
- Small timber blocks for pumpkin stems
- Exterior wood glue or construction adhesive
- Ribbon, raffia or jute
- Faux autumn leaves
- Small berry picks, acorns or pinecones
- Outdoor clear sealer
- Optional small screws for securing the stems
- Optional rubber furniture feet for the bottoms
You certainly do not need to buy new timber if you already have offcuts in the shed.
This is exactly the sort of project where slightly battered timber actually improves the finished result.
For smaller leftover pieces, you can also make these DIY Pumpkin Blocks on CraftBits. They use the same basic idea but are better suited to mantels, shelves and smaller displays.
What Size Should Wood Porch Pumpkins Be?
There really isn’t a compulsory size.
The easiest way to make the display look intentional is to create three pumpkins at noticeably different heights.
For a porch-sized trio, try approximately:
Tall pumpkin: 90-100 cm high
Medium pumpkin: 65-75 cm high
Small pumpkin: 45-55 cm high
If you are using 4×4 timber, the proportions work particularly well.
These measurements don’t have to be exact. In fact, if your scrap wood already comes in slightly odd lengths, use them.
One of the advantages of rustic fall decorating is that nobody is standing there with a measuring tape checking whether your pumpkins are symmetrical.
Step 1: Cut Your Timber
Cut three pieces of timber to your chosen heights.
If you do not own a saw, ask your local hardware store or timber supplier whether they can make the cuts for you.
Many larger hardware stores offer simple straight cuts when you purchase timber.
Before decorating anything, stand the pieces together and check that you like the proportions.
A tall centre pumpkin with two shorter pumpkins works beautifully, but you can also arrange the tallest one slightly to one side for a more relaxed look.
Step 2: Sand The Wood
Give each piece a quick sand.
You are not trying to turn construction timber into fine furniture here.
The goal is simply to:
- Remove splinters
- Smooth sharp corners
- Knock back rough patches
- Create a surface that will take paint nicely
I actually like leaving some saw marks and timber grain visible because it gives the finished pumpkins a handmade, slightly weathered look.
Wipe the wood clean after sanding so you don’t end up painting over sawdust.
If you enjoy easy projects made from leftover timber, have a look at these 10 Halloween crafts made from scrap wood too. There are several ideas that use the same sort of basic timber offcuts.
Step 3: Choose Your Pumpkin Colours
You can absolutely paint all three pumpkins orange, particularly if you love traditional fall decorating.
For a slightly more updated porch display, use three coordinating colours.
The mockup shown here uses:
- Muted sage green
- Burnt pumpkin orange
- Warm cream
Other lovely combinations include:
Traditional Fall
Pumpkin orange
Mustard yellow
Deep rust
Modern Farmhouse
Warm white
Sage green
Terracotta
Neutral Fall
Cream
Mushroom
Caramel brown
Halloween
Orange
Black
White
Try to use matte, satin or chalk-style paint rather than a high-gloss finish.
Glossy paint tends to make rustic wood projects look a little too shiny and new.
Step 4: Paint The Wooden Pumpkins
Apply the first coat of paint using a medium paintbrush.
You can completely cover the timber or deliberately leave some of the grain showing through.
Allow the first coat to dry before deciding whether you need a second coat.
For a rustic look, one uneven coat can actually be enough.
If your timber is very porous, however, you may need two coats to get a richer colour.
Make sure you paint the exposed sides as well as the front.
If these pumpkins are going outdoors, paint or seal the bottoms too. That is the area most likely to absorb moisture from concrete, decking or damp ground.
Step 5: Add Painted Patterns
Once the base paint is dry, add simple decorative patterns.
You do not need elaborate stencils.
Simple designs look much better on these long rectangular shapes.
Striped Pumpkin
Use painter’s tape to create narrow vertical or horizontal stripes.
Paint between the tape using cream or another contrasting colour.
Remove the tape while the paint is still slightly damp for cleaner edges.
Polka Dot Pumpkin
Dip a round foam brush or sponge dauber into paint and stamp dots randomly over the timber.
You can also trace around different sized lids and paint the circles by hand.
Don’t make every dot identical. Different sizes make the design much more interesting.
Botanical Pumpkin
Paint simple leafy vines using a fine brush.
This looks particularly pretty over sage green or cream.
You don’t need artistic skills here. A curved line with small leaf shapes on either side is enough to create the effect.
Chevron Pumpkin
Apply painter’s tape in zigzag lines and paint between the taped areas.
This creates a look similar to the older wooden pumpkin projects that inspired this tutorial.
Simple Pumpkin Ribs
Paint three or four narrow vertical lines down the centre of the timber.
This gives a little suggestion of pumpkin ridges without trying to disguise the fact that your pumpkin is, in reality, a rectangular block of wood.
Step 6: Distress The Paint
This step is optional, but I think it makes a huge difference.
Once the paint is completely dry, lightly sand:
- Corners
- Edges
- Raised grain
- Small random sections
You only want to expose a little of the wood underneath.
If you accidentally sand off too much paint, simply dab a little more colour over the area.
That is the joy of rustic crafting. Most mistakes can suddenly become “distressing.”
Step 7: Make The Pumpkin Stems
Cut three small rectangular blocks of timber for the stems.
Approximately 10-15 cm long works well for larger porch pumpkins.
The stem should be noticeably narrower than the pumpkin body.
Paint the stems:
- Dark brown
- Black-brown
- Charcoal
- Deep green
Or leave them as natural wood.
I like natural or stained timber against painted pumpkins because it adds another texture.
Attach the stem to the centre of the top using exterior-grade wood adhesive.
For an extra-secure stem, screw upward through the pumpkin body into the stem before decorating it.
This is worth doing if your porch is exposed to wind.
Step 8: Add Ribbon
Tie ribbon around the upper third of each pumpkin.
You can use:
- Wired fall ribbon
- Cotton ribbon
- Burlap
- Raffia
- Jute
- Torn fabric strips
For the updated version, I would avoid using identical bows on all three pumpkins.
Try cream on the orange pumpkin, burnt orange on the cream pumpkin and sage or natural jute on the green pumpkin.
That way they coordinate without looking like a matching shop-bought set.
You can either tie the ribbon directly around the timber or make a separate bow and attach it using hot glue.
For outdoor use, wiring the bow in place is more reliable than hot glue.
Step 9: Make A Small Autumn Swag
Create a little decorative bundle for underneath the bow.
You can use:
- Faux maple leaves
- Berry stems
- Miniature pinecones
- Small acorns
- Eucalyptus leaves
- Tiny artificial pumpkins
- Raffia
- Dried-looking artificial foliage
Gather a few pieces together and tie them with florist wire.
Attach the bundle underneath the ribbon.
Don’t go too crazy here.
It is very easy to start with three leaves and somehow end up with half a floral arrangement hanging off the front.
You still want to see the painted pumpkin.
Step 10: Add Outdoor Protection
If your wooden pumpkins will live on a covered porch, they may only need a light protective finish.
If they are exposed to weather, apply an outdoor-rated clear sealer.
Pay particular attention to:
- Cut timber ends
- The top around the stem
- The base
- Any cracks in the timber
The bottom is especially important because timber can wick moisture upward when sitting on wet paving or concrete.
For extra protection, stick small rubber furniture feet underneath each pumpkin.
This lifts the timber slightly off the ground and allows air to circulate underneath.
How To Arrange Your Wooden Porch Pumpkins
Group all three pumpkins together rather than spacing them evenly across the porch.
Place the tallest pumpkin toward the back.
Bring the medium and small pumpkins slightly forward.
Then add one or two softer elements around them.
Good companions include:
- A pot of chrysanthemums
- A woven basket
- Lanterns
- A fall wreath
- A rustic doormat
- A basket of faux pumpkins
- Small hay bales
- Galvanised pots
If your front door needs something to balance the display, these easy DIY fall wreaths are another simple seasonal project.
Make A Smaller Indoor Version
If your timber scraps are too short for porch pumpkins, don’t throw them away.
Make miniature versions.
Pieces around 15-30 cm tall are perfect for:
- Mantels
- Bookshelves
- Thanksgiving tables
- Sideboards
- Kitchen shelves
You can also make the smaller upcycled pumpkin blocks on CraftBits using 4×2 or 4×4 wood, a branch stem, paint and simple embellishments.
Turn Them Into Halloween Pumpkins
One of the easiest variations is to paint jack-o’-lantern faces onto the front.
Use black paint to add:
- Triangle eyes
- Toothless smiles
- Spooky faces
- Vintage pumpkin faces
Paint one pumpkin orange, one black and one white and suddenly the same project becomes Halloween porch décor.
You can place battery-operated lanterns around them in the evening for a little glow without putting anything flammable directly against the wood or ribbons.
Try A Thanksgiving Version
For Thanksgiving, skip the Halloween faces and paint words down the front instead.
Try:
THANKFUL
GATHER
WELCOME
HARVEST
You could paint one word on each pumpkin or use a single large word vertically down the tallest pumpkin.
Use Scrap Wood To Keep This Project Cheap
These pumpkins are particularly good if you have leftover fence posts, framing timber or deck offcuts.
You don’t need beautiful wood.
Knots, grain, dents and old nail holes can all become part of the finished look.
Our roundup of scrap wood Halloween craft ideas includes several other ways to use those awkward pieces that are apparently too useful to throw away but somehow manage to live in the garage for six years.
You know the pieces I mean.
Can You Use Pallet Wood?
Yes, although pallet boards are usually much thinner than 4×4 timber.
Instead of using a single block, join several pallet boards together to create a wide pumpkin sign.
Paint and decorate the front using the same techniques.
If you are using reclaimed pallets, make sure the timber is clean and suitable for crafting before bringing it indoors.
Can These Wooden Pumpkins Stay Outside?
Yes, but how long they last depends heavily on your climate and how exposed the porch is.
A covered porch is ideal.
For uncovered areas:
- Use exterior paint
- Seal all surfaces
- Keep the bottom slightly raised
- Avoid untreated fabric embellishments
- Bring the pumpkins inside during prolonged heavy rain
A little weathering looks lovely.
Rotting timber does not.
How To Store Wood Porch Pumpkins
Once fall is finished, remove any delicate floral pieces that might get crushed.
Wipe the wood clean and make sure everything is completely dry before storing.
Wrap the bows loosely with tissue paper and keep the pumpkins upright somewhere dry.
The beauty of using long rectangular timber is that they take up far less storage space than enormous artificial pumpkins.
And when September rolls around again, you simply bring them back out.
No pumpkin patch required.
More Wooden Pumpkin Ideas
Once you’ve made one set, you’ll probably start spotting pumpkin possibilities in every piece of leftover timber.
For smaller decorations, try our DIY Pumpkin Blocks on CraftBits, which use recycled timber and simple twig stems.
There’s also a completely different version using small wooden blocks in these Dollar Tree Wood Block Pumpkins. They are particularly good if you want a tabletop or mantel-sized fall craft rather than something large enough for the porch.
And if you have an entire scrap timber pile to conquer, browse these 10 Halloween crafts made from scrap wood before anyone suggests actually throwing the wood away.
These DIY wooden porch pumpkins are simple enough for a beginner, inexpensive if you use leftover timber and wonderfully forgiving.
Make them perfectly neat if that’s your style, or embrace wonky brush strokes, distressed edges and mismatched bows.
Personally, I think the slightly imperfect ones have far more charm.
And unlike the real pumpkins sitting beside them, these should still be standing proudly when Thanksgiving arrives.




how do I reach the porch pumpkin tutorial? I did not see anything to clock on that would take me there!
Olivette, the link is fixed. You should be able to visit the blog now. 🙂